Ceramic Tile Cleaning

Welcome to my Work History archive where you will find detailed examples of Ceramic Tile and Grout Cleaning/Renovation work carried out in Glasgow

Cleaning Ceramic Tiles

Ceramic tiles are usually fully glazed and so do not have any pores that dirt can become ingrained into, because of this they are easy to clean with Tile Doctor Neutral Cleaner and are generally low maintenance. Textured ceramic tiles however are one exception, they have a rough surface in order to make them less slippery and are often used around wet areas such as swimming pools. Dirt is easily trapped in the textured surface and to get these clean requires a more intensive clean ideally using a rotating scrubbing pad.

Due to their low maintenance we rarely get called to deep clean Ceramic tiles however grout is a different case. The top layer of grout is actually porous and due to it being recessed we find when they are mopped it leads to a build-up of dirt on the grout causing it to discolour. This can be resolved using Tile Doctor Pro-Clean and then once clean and fully dry, seal the grout with one coat of Tile Doctor Ultra-Seal using a pipette.

Ceramic tiles are used a lot in bathrooms and shower cubicles where again we find it’s usually the grout or silicone sealant that discolours before the tiles do. In these cases we often find the appearance can be greatly improved with the use of a Grout Colourant and replacement of the silicone.

Below you will find detailed examples of work we have carried out in the past, it should give you some idea of what’s involved and what can be achieved with the right techniques and products


Smoke Damanged Shower Tiles Before and After Restoration Ayr

Smoke Damaged Shower Cubicle Renovation in Ayr

Below are a few photos of a smoke damaged shower cubicle where we were asked by an insurance company to restore the tiles following a house fire in the town of Ayr. Just south of Prestwick airport on the South West Coast of Scotland, Ayr is built along the river of the same name and dates all the way back to 1205.

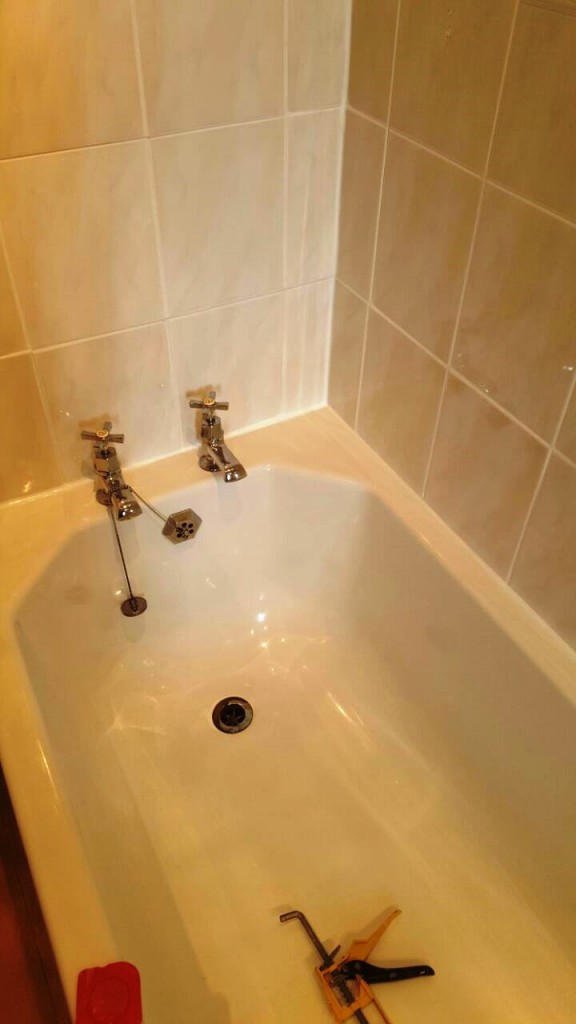
You can see from the photograph below that the tiles how bad that smoke damage was. When we arrived work had already started to strip out the electric shower and screen removing a strip of tiles in the process. It was also clear that someone had also attempted to clean the ceramic tile and grout but had given up after realising how much work was needed.

Smoke Damanged Shower Tiles Before Restoration Ayr

Cleaning Smoke Damaged Tile and Grout

We had to give the tile and grout several deep cleans using a strong dilution of Tile Doctor Pro-Clean which was sprayed on, left to dwell for a while and then scrubbed in by hand. On reflection Oxy-Gel might have been a better product for the job as it has the same active ingredients but comes in a gel form which allows it to stick to vertical surfaces resulting in longer dwell times.

We managed to successfully remove all the smoke and soot from the surface of the tile and grout with this process. However although the grout was now clean I could see it was going to need more work if it was going to pass muster.

Smoke Damanged Shower Tiles During Restoration Ayr

Grout Colouring

To overcome the grout issue I decided to colour it with a White grout colourant; this was a perfect time to apply the colourant as the Pro-Clean had prepared the grout joints and would make a good bond with the colourant. I used three coats of white grout colourant in the end, each one applied by hand with a small brush. The colourant is basically painted on top of the existing grout and any excess wiped off the adjacent tile before it dries. It’s an epoxy based formula that becomes a long-lasting barrier protecting the grout and making it much easier to clean.

Following this I cleaned the tiles down again, this time with Neutral Tile Cleaner and then turned my attention to the stained silicone sealant around the base of the shower tray which was cut out and replaced with fresh new white silicone.

I gave the shower tray a clean as well and the final result was a very fresh looking shower cubicle which will soon back in action once the other trades finish their installations.

Smoke Damanged Shower Tiles After Restoration Ayr
 

Ceramic Tiled Shower Cubicle Restored Following Fire in Ayrshire

Smoke Damaged Shower Cubicle Renovation in Ayr Read More »

Changing Grout Colour in Greenock Bathroom Before and After

Changing Ceramic Tiled Grout Colour in a Greenock Bathroom

This bathtub with shower over was at a house in the old shipbuilding port of Greenock within the historic county of Renfrewshire. I’m not sure you can appreciate it from the before photograph below, but the grout was white and was starting to discolour. The owner of the house didn’t want it to get any worse and asked us for help.

Changing Grout Colour in Greenock Bathroom Before

Preparing the Grout

We discussed the options and the benefits of applying a grout colour which would not only change the colour but also add a layer of protection over the grout which would be much easier to keep clean going forward.

With the decision made we set about cleaning the grout first with a Grout Colourant Pre-Treater that cleans and etches the grout resulting in a better bond with the grout colourant. This was followed by rinsing the grout with water to remove any dirt and remove the traces of pre-treater before drying it off with a heat gun ready for the next step.

Grout Colouring

The customer had decided on a Chocolate grout colour, so it would blend in with the brown tiles more effectively. So, once the grout has dried two coats of Tile Doctor Grout Colourant were applied over the grout with a small brush. This product is basically painted on top of the existing grout any any excess wiped off the adjacent tile before it dries. It’s an epoxy based formula that becomes a long-lasting barrier protecting the grout and as I mention before making it much easier to clean.

Last step before leaving was to strip out the stained silicone sealant between the top of the bath and tile and replaced with fresh new white silicone to match with the white bathroom suite.

Changing Grout Colour in Greenock Bathroom After
The job only took a day to complete and the owner was very pleased with the way the tiles now looked.

Applying Chocolate Grout Colour to Bathroom Tiles Inverclyde

Changing Ceramic Tiled Grout Colour in a Greenock Bathroom Read More »

Bathroom in Kilmacolm After Refresh

Ceramic Tiled Bathroom Refresh in Kilmacolm

This bathtub with shower over was at a house in the village of Kilmacolm near Greenock. As you can see from the photograph below the grout was stained in places and a tile had become loose behind the taps due to a previous leak causing it to fall out.

Bathroom Refresh Before Kilmacolm

Refreshing a Ceramic Tiles Bathroom

The first job was to put the loose ceramic tile back on the wall, a process involving the scraping off the adhesive and grout from the wall and tile before re-fixing with fresh tile adhesive and the grouting. We placed a blanket in the bathtub during the work to protect it.

Next the tiles were given a wash down Tile Doctor Pro-Clean with particular attention paid to the grout by scrubbing it with a stiff brush. It was our intention to use a grout colourant on the grout and I wanted to ensure we had a good bond.

Whilst the tiles were drying I set about stripping off the old silicone sealant between the bath and the ceramic tiles wall, debris cleared and any remaining sealant was carefully scraped away and then replaced with new silicone.

Grout Colouring

Last step was to apply two coats of white Tile Doctor Grout Colourant, this product is basically painted on top of the existing grout with any excess wiped off the adjacent tile before it dries. It’s an epoxy based formula that becomes a long lasting barrier protecting the grout and also making it much easier to clean, it looks natural and combined with the new silicone it gave the whole bath surround a real uplift.

Bathroom in Kilmacolm After Refresh
The job was completed in a day and I think you will agree the whole bath area now looks like a new installation.

Refreshing a ceramic tiled surround in the Clyde Valley

Ceramic Tiled Bathroom Refresh in Kilmacolm Read More »

Gruby Ceramic Tiled Shower in Bishopton After

Grubby Ceramic Tiled Shower Cubicle Refreshed in Bishopton

This shower cubicle was installed in the main bathroom of a house in Bishopton where the grout had become quite grubby and the Ceramic tiles were looking quite dull. The owner was thinking about re-tiling the bathroom and thought they would give us a call first to see if we could refresh the look without the expense.

Gruby Ceramic Tiled Shower in Bishopton Before Gruby Ceramic Tiled Shower in Bishopton Before

Cleaning Ceramic Tile and Grout

We started by spraying the tiles with Tile Doctor Oxy-Pro which is a strong high-alkaline cleaner especially formulated and packaged for cleaning showers. The spray delivery is important as mixing the cleaning product with air makes it lighter and helps it cling to the tile and grout. The Oxy-Pro was left to soak into the tiles for around 15 minutes before being scrubbed into the tile and grout using a stiff grout brush. This action cleaned up the grout and tile nicely removing stains from shampoos and soaps etc.

Removing Mould from Grout

The grout was looking much improved but there was however some evidence of mould remaining which needed dealing with. To tackle this we used Tile Doctor Mould Away which is designed to remove mould off Silicone and Grout. It’s very easy to use, you simply spray the Silicone or Grout to be treated with Mould Away then leave to soak in for five minutes and then scrub with a brush and rinse with water repeating the process until the mould has disappeared.

Gruby Ceramic Tiled Shower in Bishopton After Gruby Ceramic Tiled Shower in Bishopton After

It took a fair amount of manual effort but the results were well worth it as you can see.

Grubby Ceramic Tiled Shower Cubicle Refreshed in Bishopton Read More »

Glasgow Ceramic Shower Refresh After Cleaning

Mouldy Ceramic Tiled Shower Refreshed in Glasgow

A customer contacted us regarding a Ceramic Tiled Shower Cubicle problem they had with their house in Glasgow. The grout and mastic sealant had started to discolour and there was staining on both from mould which is quite a common problem in modern houses and our busy lifestyles and insulated homes with insufficient ventilation.

Cleaning Ceramic Tile and Grout

We started by giving the tiles a good scrub with Tile Doctor Pro-Clean then focusing on the grout we thoroughly scrubbed it with more Pro-Clean and a stiff grout brush, this process did well to clean up the tile and grout but unfortunately the grout had become too badly stained to be satisfactory. It’s a fact that the top layer of grout is actually porous and this is where the staining from the dyes in shampoos etc. will occur.

The next step was to cut out all the old and mouldy mastic and seal around the shower using a sharp knife taking care not to scratch the shower tray.

Glasgow Ceramic Shower Refresh Before Cleaning Glasgow Ceramic Shower Refresh After Cleaning

Recolouring Grout

To overcome the stained grout issue we gave the whole of the grout two coats of white Grout Colourant which is a very effective treatment that forms an epoxy barrier over the gout protecting it from future staining. Normally when you do this we recommend using a pre-treater product that provides a chemical key that allows the colourant to latch on to, in this case however I was happy that the scrubbing we gave the grout with Pro-Clean would have the same effect. The tiles were then wiped down using Tile Doctor Neutral Cleaner to remove any excess colourant from the tiles and give them a finishing shine.

The last step was to Shower was finished off by applying new silicone sealant to the areas that were removed. The final result was a shower cubicle that looked recently installed.

Refreshing a Ceramic Tiled Shower Cubicle in Glasgow

Mouldy Ceramic Tiled Shower Refreshed in Glasgow Read More »

=================================

Glasgow Tile Doctor

================================= Read More »

Scroll to Top